Wednesday, January 20, 2016

Site Development Process

The Site Development Process

Every significant web project poses unique challenges, but the overall process of developing a complex web site generally follows six major stages that you should think through before crafting your final project planning and proposal documents:
  1. Site definition and planning
  2. Information architecture
  3. Site design
  4. Site construction
  5. Site marketing
  6. Tracking, evaluation, and maintenance
Developing a large web site is a process that may have far-reaching budgetary, personnel, and public relations consequences for an organization, both during the development of the site and long after its deployment. Too many web sites begin life as ad hoc efforts, created by small interest groups working in isolation from their peers elsewhere in the organization and without fully considering the site’s goals within the context of the organization’s overall mission. The result of poorly planned, hasty development efforts often is an “orphan site,” starved of resources and attention.
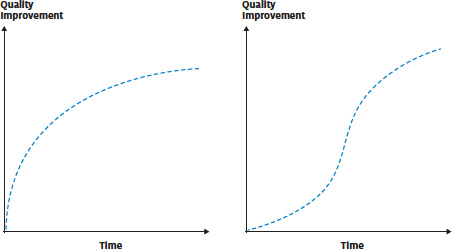
As you consider the development process outlined below, note that the construction of the pages that make up the web site is one of the last things that takes place in a well-designed project. Consider each step in the process and its impact on your developing project charter plan (see Developing a Project Charter, below). Think before you act, and make sure you have the organizational backing, budget, and personnel resources you’ll need to make the project a success (fig. 1.8).
A large diagram showing in conceptual form the whole web design process, from initial beginnings through final design and launch.
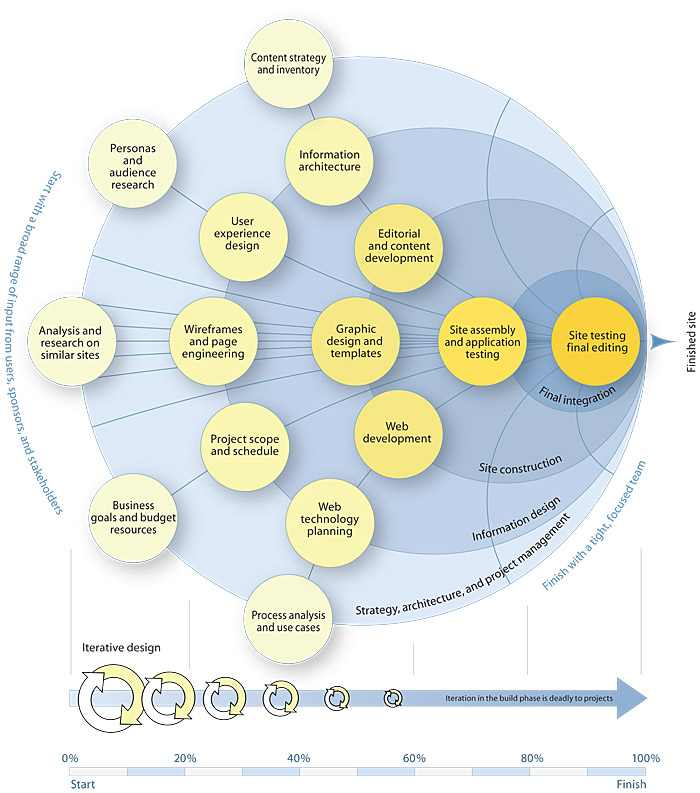
Figure 1.8 — Another concept of web development projects, here emphasizing the necessary tightening of focus from broad input and participation in the beginning, to a narrow focused team at the end. Necessary, that is, if you ever want to finish your site on time and on budget.

Site definition and planning

This initial stage is where you define your goals and objectives for the web site and begin to collect and analyze the information you’ll need to justify the budget and resources required. This is also the time to define the scope of the site content, the interactive functionality and technology support required, and the depth and breadth of information resources that you will need to fill out the site and meet your users’ expectations. If you are contracting out the production of the web site, you will also need to interview and select a site design firm. Ideally, your site designers should be involved as soon as possible in the planning discussions.

Site production checklist

Not every site will require detailed consideration of every item on the lists below. Web teams within corporations or other large enterprises can often count on substantial in-house technology support when creating web sites. If you are on your own as an individual or small business, you may need to contract with various technology and design vendors to assemble everything you’ll need to create a substantial content site or small e-commerce site.

Production

  • Will your site production team be composed of in-house people, outside contractors, or a mix of the two?
  • Who will manage the process?
  • Who are your primary content experts?
  • Who will be the liaison to any outside contractors?
  • Who will function long-term as the webmaster or site editor?

Technology

  • What operating systems and browsers should your site support?
  • What is the network bandwidth of the average site visitor?
    • Internal audience or largely external audience
    • Ethernet or high-speed connections typical of corporate offices
    • isdn, or dsl medium-speed connections typical of suburban homes
    • Modem connections for rural audiences
  • Will the site have dynamic html and advanced features?
    • JavaScript required
    • Java applets required
    • Third-party browser plug-ins required
    • Special features of the Linux, unix, or Microsoft iis server environments required
    • Special security or confidentiality features required
  • How will users reach support personnel?
    • Email messages from users
    • Chat rooms, forums, help desks, or phone support
  • Does the site require database support?
    • User logins required to enter any site areas
    • Questionnaires required
    • Search and retrieval from databases needed
  • Will the site have audiovisual content?
    • Video or audio productions

Web server support

  • Will the site reside on an in-house web server or be outsourced to an Internet service provider for web hosting?
    • Disk space limitations, site traffic limitations, extra costs
    • Adequate capacity to meet site traffic demands
    • Twenty-four-hour, seven-day-a-week support and maintenance
    • Statistics on users and site traffic
    • Server log analysis: in-house or outsourced
    • Search engine suitable for your content
    • cgi, programming, database middleware support
    • Database support or coordination with in-house staff

Budgeting

  • What are staffing costs?
    • Short-term development staff
    • Long-term editorial and support staff (site editor or webmaster)
    • Ongoing server and technical support
    • Database maintenance and support
    • New content development and updating
  • What hardware and software are needed for in-house development team members?
  • What are staff training costs?
    • Web use, database, web marketing, web design
  • What are the outsourcing fees?
    • Site design and development
    • Technical consulting
    • Database development
    • Site marketing

Appoint a site editor to become the “process manager”

Every successful new web site makes a transition from a development project to an ongoing editorial process that keeps the site alive and fresh over time. You’ll need a project manager to get your new site launched, but you’ll also need to hand the site over to a process manager (read: “editor”) after the site is launched. A site that is “everyone’s responsibility” can quickly become an orphan. For current content and consistent editorial, graphic design, and management policies you’ll need one person to act as the editor of the overall web site. The site editor’s duties will vary according to how you choose to maintain your site. Some editors do all the work of maintaining site content, relieving their coworkers of the need to deal directly with web page editing. Other editors coordinate and edit the work of many contributors who work directly on the site pages, aided by a maintenance plan that specifies who is responsible for the content of each section of the site. When multiple people contribute to site maintenance, the site editor may choose to edit pages after they are created and posted to avoid becoming a bottleneck in the communications process. However, high-profile public pages or pages that contain important information should be vetted by the editor before posting. A site editor will also typically bear the primary responsibility for keeping the site content as visible as possible in local enterprise or general Internet search engines. Broken links and scrambled content organization schemes can harm your search engine rankings and make your content harder for users to locate. The site editor is also the logical person to handle the collection and analysis of web site analytics and to produce periodic reports on the usage of the site.
In addition to ensuring editorial quality, a site editor must also make certain that the content of the site reflects the policies of the enterprise, is consistent with local appropriate use policies, and does not contain material that violates copyright laws. Many people who post pictures, cartoons, audiovisual files, or written material copied from other sites on their own sites do not understand copyrights and the legal risks in using copyrighted materials inappropriately. A site editor is often an institution’s first line of defense against an expensive lawsuit over the misuse of protected material.

Information architecture

At this stage you need to detail the content and organization of the web site. The team should inventory all existing content, describe what new content is required, and define the organizational structure of the site. Once a content architecture has been sketched out, you should build small prototypes of parts of the site to test what it feels like to move around within the design. Site prototypes are useful for two reasons. First, they are the best way to test site navigation and develop the user interface. The prototypes should incorporate enough pages to assess accurately what it’s like to move from menus to content pages. These prototypes can be used to test the information architecture with users. Second, creating a prototype allows the graphic designers to develop relations between how the site looks and how the navigation interface supports the information design. The key to good prototyping is flexibility early on: the site prototypes should not be so complex or elaborate that the team becomes too invested in one design at the expense of exploring better alternatives.
Typical results or contract deliverables at the end of this stage include:
  • Detailed site design specification
  • Detailed description of site content
    • Site maps, thumbnails, outlines, tables of contents
  • User-tested wireframes and prototypes demonstrating site architecture
  • Multiple graphic design and interface design sketches
  • Detailed technical support specification
    • Browser technology supported
    • Connection speed supported
    • Web server and server resources
  • Proposals to create programming or technology to support specific features of the site
  • A schedule for implementing the site design and construction

Site design

At this stage the project acquires its look and feel, as the page grid, page design, and overall graphic design standards are created and approved. Now the illustrations, photography, and other graphic or audiovisual content for the site need to be commissioned and created. Research, writing, organizing, assembling, and editing the site’s text content is also performed at this stage. Any programming, database design and data entry, and search engine design should be well under way by now. The goal is to produce all the content components and functional programming and have them ready for the final production stage: the construction of the actual web site pages.
Typical products or deliverables at the end of this stage include:
Content components, detailed organization and assembly
  • Text, edited and proofread
  • Graphic design specifications for all page types
    • Finished interface graphics for page templates
    • Header and footer graphics, logos, buttons, backgrounds
  • Detailed page comps or finished examples of key pages
    • Site graphic standards manual for large, complex sites
  • Interface design and master page grid templates completed
    • Finished html template pages
  • Illustrations
  • Photography
Functional and logic components
  • JavaScript scripts, Java applets designed
  • Database tables and programming, interaction prototypes completed
  • Search engine designed and tested

Templates

Whether you develop your site on your own or hire a professional web developer, you should develop page templates for your new web site. It’s much easier to add new pages when you can start from a page that already contains basic navigation and site graphics. If you have a team working on page development, you will want to share templates, along with standards on how to handle page text and content graphics. Popular web site development software such as Adobe Dreamweaver offer powerful templates and standard reusable libraries of site graphics and html that make it easy to create new pages and maintain consistency in your site.

Accessibility

In most large enterprises, providing universal access to web pages is long-established institutional policy, and in many instances it is required by state or federal regulations. It is critical, therefore, that you validate your designs and page templates and the content of your site throughout the development process to ensure that your pages are accessible to all users. Use the guidelines and techniques developed and maintained by the Web Accessibility Initiative (wai) as a measure against which to test the accessibility of your pages.

Site construction

Only at this mature stage of the project are the bulk of the site’s web pages constructed and filled out with content. By waiting until you have a detailed site architecture, mature content components, fully tested wireframes and prototypes, and a polished page design specification you will minimize the content churning, redundant development efforts, and wasted energy that inevitably result from rushing to create pages too soon. Of course, you will always learn new things about your overall design as the prototype matures into the full-blown web site. Be prepared to refine your designs as you and your users navigate through the growing web site and discover both weak spots and opportunities to improve navigation or content.
Once the site has been constructed, with all pages completed and all database and programming components linked, it is ready for user testing. Testing should be done primarily by people outside your site development team who are willing to supply informed criticism and report programming bugs, note typographic errors, and critique the overall design and effectiveness of the site. Fresh users will inevitably notice things that you and your development team have overlooked. Only after the site has been thoroughly tested and refined should you begin to publicize the url of the site to a larger audience.
Typical products or deliverables at the end of this stage should include:
  • Finished html for all web pages, all page content in place
  • Finished navigation link structure
  • All programming in place and linked to pages, ready for user testing
  • All database components in place and linked to site pages
  • All graphic design, illustration, and photography in place
  • Final proofreading of all site content
  • Detailed testing of database and programming functionality
  • Testing and verification of database reporting features
  • Testing of site user support procedures, answering email, etc.
  • Archives of all site content components, html code, programming code, and any other site development materials

Maintainable code

Most businesses or departments in larger enterprises will contract with a web development group to create the initial site design and to build all the pages in the first version of the web site. They then assume responsibility for the site, doing some or all of the daily maintenance and updating content as needed to keep the site current.
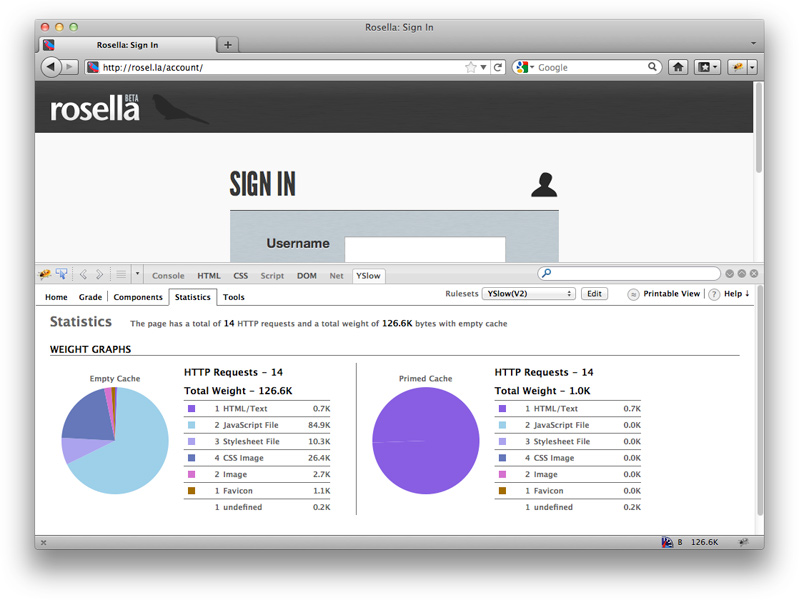
Often not until the practicalities of site maintenance arise do customers realize the importance of understanding the details of how the web developer generated the html and other code that makes up the web site. Although all html and css markup is much the same to web browsing software, how the html and css is formatted and what web authoring tool the developer used can make a huge difference in how the code looks to a human reader.
Consider the two code examples below:

Example 1

<table summary=”HR Committee Schedule, FY 2008”>
<tr>
<th>Meeting Dates 2008</th>
<th>Agenda Item Submission Deadline</th>
</tr>
<tr>
<td>Monday, Oct 6, 2008</td>
<td>Friday, Oct 3, 2008</td>
</tr>
</table>

Example 2

<table summary="HR Committee Schedule, FY 2008"> <tr> <th>Meeting Dates 2008</th> <th>Agenda Item Submission Deadline</th> </tr> <tr> <td>Monday, Oct 6, 2008</td> <td>Friday, Oct 3, 2008</td> </tr> </table>
Which example do you find easier to understand? These code examples are exactly equivalent to a web browser, but most people would find Example 1 significantly easier to read and understand. If you contract with a developer to build your site, it is important to understand how the developer writes code, what state the code will be in when the site is delivered, and whether the software used by the developer is compatible with what you will be using to maintain the site after delivery. Some web development software produces html code that is nearly impossible for a human to read without significant (and expensive) reformatting. Other programs (such as Adobe Dreamweaver) produce html code that is easy for web programmers to read, which can make a huge difference if you decide to change web developers or if you decide to edit html directly when maintaining your site.
If you hire someone to create your web site or components of your site, such as database or dynamic elements, be sure to ask what tools they will use to write the html and any other code. Ask to see examples of code written for other clients. Have your technology lead examine the code to be sure the developer inserts explanatory comments and dividers for legibility in the code. Be sure to find out whether there will be problems or conflicts if you use your favorite tools to edit the code the developer produces. Make sure the developer understands what editing tools you prefer to use and develops the code for maximum compatibility with your maintenance tools.

HTML and CSS code validation

Also ask for representative sites the developer has created, and choose pages to test for code validity, using the free online tools available from thew3c (see below). Many perfectly functional pages will fail w3c validity tests either for relatively minor code mistakes or for complex links to database or application urls that use problematic characters like ampersands (&). Ignore minor failures in the code validation, since they are unlikely to cause major functional problems. But if representative pages come back from testing with long lists of html code problems and css mistakes, beware of that developer’s work, and thoroughly discuss and put in writing your expectations around code validation as part of any contract.
html and css code validation tools from the w3c:
Today’s web pages are much more complex than pages in the past, and many new mobile and other devices can now display web pages. Search visibility is crucial to successful web sites, and web accessibility is a legal requirement with a growing set of case law behind it. Using carefully validated html and css code is one of your best strategies for getting maximum flexibility and value from your web development dollars. Be extremely wary of a web developer who tells you, “Validation isn’t important.”

Site marketing

Your web site should be an integral part of all marketing campaigns and corporate communications programs, and the url for your site should appear on every piece of correspondence and marketing collateral your organization generates.
If your web site is aimed primarily at local audiences you must look beyond getting listed in standard web indexes, such as Yahoo! and Google, and publicize your url where local residents or businesses will encounter it. Local libraries, newspapers, and schools are often the key to publicizing a new web site within a specific locale.
You may also find opportunities to cross-promote your site with affiliated businesses, professional organizations, broadcast or print media, visitor or local information agencies, real estate and relocation services, Internet access providers, and local city or town directory sites. Your organization could also feature local nonprofit charitable or school events on your web site. The cost in server space is usually trivial, and highly publicized local events featuring a web page hosted within your site will boost local awareness of your web presence. Site sponsorship might also interest local broadcast media as an interesting story angle.
Your home page url should appear in all:
  • Print advertisements
  • Radio and television advertisements
  • Lobby kiosks in high-traffic areas of your enterprise or in local libraries, schools, or other suitable venues
  • Direct mail campaigns
  • Business cards
  • Stationery
  • Bills and statements
  • Product manuals and product packaging
  • Response cards and warrantee cards
  • Publications and promotional materials
  • Press releases
  • Posters and billboards

Tracking, evaluation, and maintenance

Your web server software can record an abundance of information about visitors to your site. Even the simplest site logs track how many people (unique visitors) saw your site over a given time, how many pages were requested for viewing, and many other variables. By analyzing the server logs for your web site you can develop quantitative data on the success of your site. The logs will tell you which pages were the most popular and what brands and versions of web browser people used to view your site. Server logs can also give you information on the geographic location of your site users. Detailed logs are the key to quantifying the success of a web site. Your webmaster should archive all site logs for long-term analysis and should be prepared to add or change the information categories being logged as your needs and interests change.
A number of popular software packages are designed to produce easily readable site traffic reports, complete with data graphics and charts to aid in data analysis. As a service to customers, site hosting companies often offer reports from popular site analysis programs like Google Analytics for no additional charge. Before contracting with an Internet service provider for site hosting services, always ask about site analysis services. If your isp(Internet service provider) or corporate web site does not offer a good site traffic analysis package, ask whether the webmaster can give you access to a monthly server log of your account. Basic versions of traffic analysis programs like WebTrends are inexpensive and you can run them on a personal computer if you can gain access to the raw web server log from your isp or corporate webmaster (fig. 1.9).
A screen capture from Google Analytics, showing the various tabular data and graphic chart data displays of web site metrics.
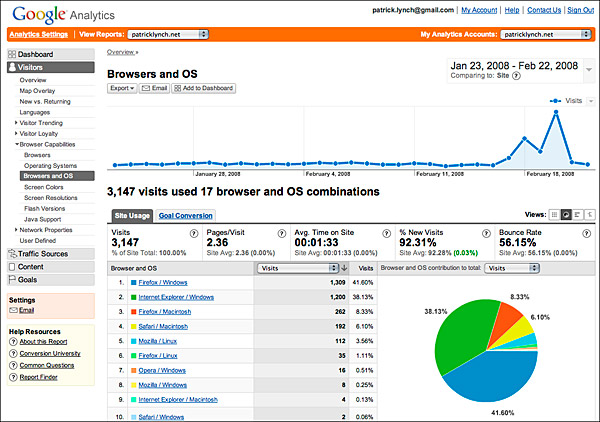
Figure 1.9 — Web statistics are much more than just raw measures of traffic. They can tell you what content people looked at, where your visitors are coming from, and provide a rich set of technical information on what technology your typical readers are using. From Google Analytics.

Maintaining the site

Don’t abandon your site once the production “goes live” and the launch parties are over. The aesthetic and functional aspects of a large web site need constant attention and grooming, particularly if a group of individuals shares responsibility for updating content. Your site editor will need to be responsible for coordinating and vetting the new content stream, maintaining the graphic and editorial standards, and ensuring that the programming and linkages of all pages remain intact and functional. Links on the web are perishable, and you’ll need to check periodically that links to pages outside your immediate site are still working. Don’t let your site go stale by starving it of resources just as you begin to develop an audience—if you disappoint them by not following through, it will be doubly difficult to attract your audience back to the site.

Backups and site archives

The site editor should be sure that the web site is regularly backed up onto a secure and reliable storage medium to ensure that a catastrophic hardware failure in your web server does not wipe out your web site. Most web servers maintained by it professionals or commercial web service providers are backed up at least once a day. If you don’t know what your backup schedule is, ask your webmaster or web hosting provider. Human error is the most common reason you may need quick access to a backup copy of your web site. Unfortunately, it’s easy to overwrite an old file (or a whole directory of files) accidentally over a newer version on the web server, to delete something important in error, or to wipe out someone else’s work by mistake when updating a web site. A recent backup (ideally no more than twenty-four hours old) can often be a lifesaver.
If your site is successful, it will quickly become an important record of your enterprise’s work, your accomplishments, and a valuable record of the “state of things” as the site evolves over time (fig. 1.10). Unfortunately, too little attention is paid to this aspect of web sites, and we are collectively losing huge pieces of our hig because no one thinks about preserving permanent records of a web site. Unless your web site is prohibitively large, your web site editor should arrange to collect and store the files of the site periodically or contract with your web service provider to set aside a backup version at regular intervals as a long-term archive. We take for granted the “paper trail” of history left by conventional business and work practices. Without a plan for preserving our digital works, our collective history may vanish without a trace.
A four-part diagram comparing the gradual evolution and growth over time of old buildings (show as building diagrams) and old web sites (show as site diagrams).
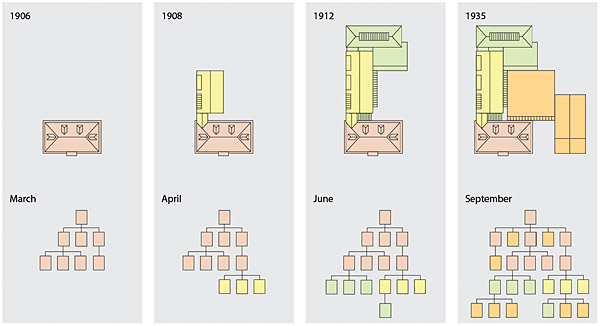
Figure 1.10 — Much as older buildings grow through additions and adaptation over time, sites grow and change in response to changing needs and ideas. (Adapted from Stewart Brand’s How Buildings Learn.)

Testing & Deployment

Testing and deployment

Testing: it’s one of those potentially dull and yet highly contentious topics. I’ll try to avoid the dull, but there may be some contention brewing on the horizon.
Most programmers work on software that others have created and that others will develop after them. Sharing the code creates a community in which the team of developers live and interact. Preserving code quality not only has a direct impact on how well a developer can do their job, it becomes a moral obligation to their colleagues in the community.
Add to this the responsibility to deliver quality to the paying customer, the direct relationship between app uptime and revenue, plus the difficulty of testing in a complex web ecosystem, and it’s easy to see why web developers have a love/hate relationship with testing.

What to test

Web app tests fall into five main categories:
  • Functional tests: does the app work?
  • Compatibility tests: does the app work consistently for everyone?
  • Performance tests: does the app respond quickly and how does traffic affect performance?
  • Security tests: is the app secure against attacks?
  • Usability tests: is the app easy to use and does it respond to interaction as expected?
All these tests add up to a lot of time, but do you really need them all? As usual, it depends. Let common sense prevail. If your app is used in a hospital to prescribe medication doses, or it’s a critical financial component in a large enterprise, don’t skimp on the tests. On the other hand, I suspect that most of you are building a spanking new web app that doesn’t impact human safety or hundreds of jobs. The critical thing to remember for new ideas is that your app will probably change.
If you’re following this book’s advice to build a minimum viable product, you will do the bare minimum necessary to get something out the door as quickly as possible to test the waters. Once you know more about your market, you can refine your app and try again, each time inching closer to a product that your customers want.
Focus your tests around the MVP process and apply the same minimal approach. Test what you need to ensure that your product is given a fair chance in the market, but don’t worry about scaling to 100,000 customers or about the long-term testability of your code: it is likely to change significantly in the first few iterations. Your biggest problems right now are identifying desirable features and getting people to use the app.
img-20_1
Some types of test require greater investment than others before they pay off.
Some tests yield improvements quickly (the left graph) whereas others require more investment before they start to pay off (the right graph). Be lazy and target the quick wins for your MVP. Invest in medium-term tests when your app finds a foothold in the market, and as your codebase undergoes less change between revisions.

Functional testing

The lazy version of functional testing is more accurately called system testing, which confirms that the app works as a whole but doesn’t validate individual functions of the code.
First, you create a simple test plan listing the primary and secondary app features and paths to test before each release. Next, you or your team should personally use the app to run through the test plan and check for major problems. Finally, ask some friends or beta testers to use the app and report any problems.
That’s it. Any bugs that aren’t discovered through regular activity can probably be disregarded for the time being. It’s not comprehensive or re-usable, but for an MVP app with minimal features it should cover the basics. When your app gains traction and the codebase begins to settle between iterations, it’s time to progress to a medium-term investment in functional testing: automated unit and interface tests that enable efficient regression tests of changes between versions – don’t worry, I’ll decipher what these mean in the next section.

Unit tests

A unit test is a piece of code designed to verify the correctness of an individual function (or unit) of the codebase. It does this through one or more assertions: statements of conditions and their expected results.
To test a function that calculates the season for a given date and location, a unit test assertion could be, “I expect the answer ‘summer’ for 16 July in New York”. A developer normally creates multiple test assertions for non-trivial functions, grouped into a single test case. In the previous example, additional assertions in the test case should check a variety of locations, dates and expected seasons.
Not all functions are as straightforward to test. Many rely on data from a database or interactions with other pieces of code, which makes them difficult to test in isolation. Solutions exist for these scenarios, such as mock objects and dependency injection, but they create a steep initial learning curve for those new to unit testing.
It also takes some investment to pay off. Even a simple web app can contain hundreds of individual functions. Not all require a unit test, but even if the initial tests are focused solely on functions that contain critical logic, a significant number may be required to catch all of the important bugs.
The effort does eventually pay off, however. Commonly stated benefits of unit testing include:
  • Greater ease in making sizeable changes to the code. Unit tests are automated and isolated to individual functions, allowing you to quickly check whether changes break existing functionality.
  • Better designed, re-usable code. Developers familiar with unit testing tend to create code that is easier to test (known as the code’s testability). This inherently encourages best practices: independent, decoupled functions with clear logical responsibilities.
  • Better documentation. A unit test provides a developer with an easy way to understand a function’s behaviour, and is more likely to be updated than a document.
Some developers find unit testing so beneficial that they make it the initial scaffolding from which the app is developed. Under this test-driven development approach, each test is written prior to the functional code, to define the expectations of the function. When it is first run, the test should fail. The developer then writes the minimum amount of code necessary to satisfy the test. Confidence in the successful test enables the developer to iteratively re-factor improvements to the code.
Whether or not you decide to adopt test-driven development, hundreds of frameworks are available to ease your implementation of automated unit testing. The Wikipedia list1 is a great place to start.

Automated interface testing

Web app logic is shifting from the server to the browser. As your app progresses from a simple MVP to a more mature product, the interface code will become more elaborate, and manual tests more cumbersome.
Automated interface tests share the same assertion principle as unit tests: conditions are set and the results are checked for validity. In the case of interface tests, the conditions are established through a number of virtual mouse clicks, form interactions and keystrokes that simulate a user’s interaction with the app. The result is usually confirmed by checking a page element for a word, such as a success message following a form submission.
In terms of automated interface test frameworks, a sole developer or small team of developers who are intimately familiar with the interface code may prefer the strictly code-oriented approach of a tool such as Watir2. For larger teams or apps with particularly dynamic interfaces, the graphical test recording of Selenium3 may be better suited. Both tools support automated tests on multiple platforms and browsers.
Once you’ve started automated interface testing it’s easy to get sucked in, as you try to cover every permutation of user journey and data input. For the sake of practicality, it’s best to ignore business logic in the early days: tests for valid shipping and tax values are better served in unit tests. Instead, create tests for critical workflows like user registration and user login – verify paths through the interface rather than value-based logic.

Compatibility testing

Print designers and television companies enjoy a luxury unknown to web developers: the limits of their media. We must contend with the rapid proliferation of devices and software with differing capabilities, and must squeeze as much compatibility as we can out of our apps to attract and retain the largest possible audience.

The main causes of web app incompatibility are:
  • Web browsers. Internet Explorer, Firefox, Google Chrome and Safari each enjoy a non-trivial market share, with variations in rendering and JavaScript engines.
  • Versions. Web browsers regularly update their layout engines and technology support. Internet Explorer 9 renders a webpage very differently from Internet Explorer 6. Google Chrome progressed from version 0.2 to version 10 in less than three years4, a major release every three months on average.
  • Operating systems. Web browsers are not consistent across operating systems, even if the differences are limited to native interface components like form buttons. For example, Safari displays slight differences between Windows, Mac OS X and iOS.
  • Devices. Desktop computer, laptop, tablet, smartphone, LCD television and digital projector: each has a hardware and software profile that influences the display and experience of your web app.
  • Display profiles. Screen resolution, pixel density and colour management variations alter the perception of your app interface.
  • Configurations and preferences: Window sizes, plug-ins, fonts, zoom magnification and browser privacy settings vary from user to user.
  • Personal capabilities. Each of us has a unique set of physical and mental capabilities that changes throughout our lives, from our ability to see, hear and move, to the language and words that we understand. Addressing these accessibility needs is not only commercially shrewd, it is a legal requirement in many countries5.
  • Environments. The local environment may override the capabilities of the device and user. For example, audio, display or device input may be restricted if the user is browsing in a coffee shop, in direct sunlight or in a noisy classroom.
That seems like an awful lot to think about, but the extent to which the technical compatibility factors affect the success of your app will depend on your target market.
img-20_2
Markets with high and low technical sophistication tend to exhibit less diversity in web software and devices
If your app is targeted at web developers or other technology-savvy users (AKA geeks), you can presume that a majority will have recent web browser versions and sophisticated hardware. Alternatively, for an app designed for a traditional financial enterprise, you may be able to assume a majority of users with Microsoft operating systems and Internet Explorer. Only a mass-market app (Google, Facebook and the rest) must consider the widest possible variation in hardware, software and user capabilities from the get-go.
If you don’t trust your gut audience stereotypes to refine the range of your compatibility tests, use analytics data from your teaser page or MVP advertising campaign. Build a quantified profile of your target market and aim to provide compatibility for at least 90% of the users based on the largest share of browser/operating system/version permutations.
Worst case: if you can’t assume or acquire any personalised statistics, test compatibility for browsers listed in the Yahoo! A-grade browser support chart6.
It’s important to realise that not all market segments offer equal value. To use a sweeping generalisation as an example, you may find that Mac Safari users constitute a slightly smaller share of your visitors than Windows Firefox users, but they convert to paid customers at twice the rate. It’s important that you measure conversion as quickly as possible in your app lifecycle (you can start with users who sign up for email alerts on the teaser page) and prioritise compatibility tests accordingly.
You can overcome cross-browser inconsistencies if you take advantage of mature front-end JavaScript libraries, CSS frameworks and a CSS reset style sheet. Some additional problems may be resolved by validating your HTML and CSS; use the W3C online validator7 or install a browser validation plug-in to detect and correct mistakes.
To achieve accurate cross-browser compatibility you’ll need regular access to a variety of browsers, versions and operating systems. You may find that online services like Browsershots8 or Spoon9 suit your needs, but to regularly test dynamic web interfaces, nothing beats having a fast local install of the browser, either as a native installation or in a local virtual environment, such as VMWare10 or Parallels11. Microsoft handily makes virtual images of IE6, 7 and 8 available12. If you opt for virtualisation, upgrade your computer’s memory to appreciably improve performance.

Aiming for compatibility on all four major browsers, many developers favour a particular testing order:
  1. Google Chrome. Excellent modern standards support, efficient rendering, a speedy JavaScript engine and integrated debugging tools make Chrome a great baseline for standards-based browser compatibility.
  2. Safari. As the internal WebKit rendering engine is shared with Chrome, achieving Safari compatibility should be a straightforward second step.
  3. Firefox. Firefox feels a little slower to regularly tweak-and-refresh, but a high adherence to standards and mature debugging tools ease compatibility from Chrome and Safari to Firefox.
  4. Internet Explorer. Finally, once the standards-based browsers have been satisfied without too many tweaks to the code, it’s time to slog through the browser-specific workarounds for the several popular but often standards-averse versions of Internet Explorer.
Like cross-browser tests, accessibility tests are offered by a number of free online web services, (WAVE13, for example). Automatic tests can only detect a subset of the full spectrum of accessibility issues, but many of the better services behave as guided evaluations that walk you through the manual tests. For apps in development that aren’t live on the web, or for a faster test-fix-test workflow, you may prefer to use a browser plug-in, like the Firefox Accessibility Extension14.

Some of the most important accessibility issues15 to test include:
  • Do images, videos and audio files have accurate text alternatives?
  • Do form controls have relevant labels or titles?
  • Is the content marked up with the most appropriate semantic HTML, including form and table elements?
  • Does the app reset the focus to the new content after an Ajax content update?
  • Do colour and contrast choices allow the text to be read easily?
  • If colour is used to convey information (in required form fields, for instance), is the same information also available in text format?
  • Can all of the app functionality be accessed using the keyboard alone?

Performance testing

Web app responsiveness can be evaluated through performance tests, load tests and stress tests. For the sake of practicality, you may want to consider starting with simple performance tests and hold off on the more exhaustive load and stress tests until you’ve gained some customers. Luckily for us, scalable cloud hosting platforms enable us to be slightly lazy about performance optimisation.

Performance tests

Performance tests measure typical response times for the app: how long do the key pages and actions take to load for a single user? This is an easy but essential test. You’ll first need to configure your database server and web application server with profilers to capture timing information, for example with Microsoft SQL Server Profiler (SQL Server), MySQL Slow Query Log (MySQL), dotTrace16 (.NET), or XDebug17 with Webgrind18 (PHP). You can then use the app, visiting the most important pages and performing the most common actions. The resultant profiler data will highlight major bottlenecks in the code, such as badly constructed SQL queries or inefficient functions. The Yahoo! YSlow19 profiler highlights similar problems in front-end code.
Of course, this isn’t an accurate indication of the final production performance, with only one or two people accessing the app on a local development server, but it’s valuable nonetheless. You can eliminate the most serious obstructions and establish a baseline response time, which can be used to configure a timed performance test as an automated unit or interface test.
img-20_3
Yahoo! YSlow

Load tests

Load tests simulate the expected load on the app by automatically creating virtual users with concurrent requests to the app. Load is normally incremented up to the maximum expected value to identify the point at which the application becomes unresponsive.
For example, if an app is expected to serve 100 users simultaneously, the load test might begin at 10 users, each of whom make 500 requests to the app. The performance will be measured and recorded before increasing to 20 users, who each make 500 requests, and so forth.
New bottlenecks may appear in your web app profiling results that highlight a need for caching, better use of file locking, or other issues that didn’t surface in the simpler single-user performance test. Additionally, load tests can identify hard limits or problems with server resources, like memory, disk space and so on, so be sure to additionally profile your web server with something like top20 (Linux) or Performance Monitor21 (Windows).
Because load tests evaluate the server environment as well as the web app code, they should be run against the live production server(s) or representative development server(s) with similar configurations. As such, the response times will more accurately reflect what the user will experience. Which brings us to an interesting question: what is an acceptable response time?
It all depends on the value of the action. A user is more prepared to wait for a complex financial calculation that could save them hundreds of dollars than to wait for the second page of a news item to load. All things considered, you should aim to keep response times to less than one second22 to avoid interrupting the user’s flow.
Free load testing software packages include ApacheBench23, Siege24, httperf25, and the more graphical JMeter26 and The Grinder27.

Stress tests

A stress test evaluates the graceful recovery of an app when placed under abnormal conditions. To apply a stress test, deliberately remove resources from the environment or overwhelm the application while it is in use:
  • Use a load test tool to simulate an unsupportable volume of traffic.
  • Create a large temporary file that fills the available disk space.
  • Restart the database server.
  • Run a processor-intensive application on the web server.
When the resources are reinstated the application should recover and serve visitors normally. More importantly, the forced fail should not cause any detrimental data corruption or data loss, which may include:
  • Incomplete cache files that are mistakenly processed or displayed when the app recovers.
  • An incomplete financial transaction, where payment is taken from the customer but their order is not recorded.
Because a stress test tackles infrequent edge cases, it is another task that you can choose to defer until your app begins to see some success, even if you do have to deal with the occasional consequence, such as manual refunds and cache re-builds.

Security testing

The discouraging reality is that it’s impossible to be fully secure from all the varieties of attacks that can be launched against your app. To get the best security coverage, it is vital to test the security of your app at the lowest level possible. A single poor cryptography choice in the code may expose dozens of vulnerabilities in the user interface.
There really is no substitute for your team having sufficient knowledge of secure development practices (see chapter 18) at the start of the project. “An ounce of prevention is worth a pound of cure”, as the internet assures me Benjamin Franklin once said, albeit about firefighting rather than web app security.
The next best thing is to instigate manual code reviews. If you’re the sole developer, put time aside to review the code with the intention of checking only for potential security vulnerabilities. If you’re working in a team, schedule regular team or peer reviews of the code security and ensure that all developers are aware of the common attack vectors: unescaped input, unescaped output, weak cryptography, overly trusted cookies and HTTP headers, and so on.
If your app handles particularly sensitive information – financial, health or personal – you should consider paying for a security audit by an accredited security consultant as soon as you can afford to. Web app security changes by the week and you almost certainly don’t have the time to dedicate to the issue.
You should frequently run automated penetration tests, which are not a silver bullet but are useful for identifying obvious vulnerabilities. Many attackers are amateurs who rely on similar automated security test software to indiscriminately scattergun attack thousands of websites. By running the software first, you’re guarding against all but the most targeted of attacks against your app. Skipfish28, ratprox297 and the joyously named Burp Intruder30 are three such tools that can be used in conjunction with data from the attack pattern database fuzzdb31.
For a fuller understanding of web app security testing, put some time aside to read through the comprehensive OWASP Testing Guide32.

Usability testing

See chapter 15 for an in-depth look at usability testing.

Deployment

In the early stages of your web app’s development you’ll probably manually copy files from your local development computer to your online server. While you have no customers and a simple single server, it’s more valuable to devote your time to iterations of your MVP features than to a sophisticated deployment process.
As the customer base, technical complexity and hosting requirements of your app grow, the inefficiency and fragility of manual SFTP sessions will quickly become apparent.
Automated deployment isn’t only about enforcing the quality of code upgrades and reducing downtime. A solid deployment tool gives you the confidence to push changes to your users more easily, speed up the feedback loop on new features, isolate bugs quicker, iterate faster and build a profitable product sooner.
The simplest form of automated deployment will script the replication of changed files from your local environment to the live server. You can do this through your version control software33 or rsync34, but eventually you’ll run into problems with choreographing file and database changes, differences in local/live configuration, and any number of other technical intricacies.
A better solution assumes that the app deployment has three parts: the local preparation (or build), the transfer of files, and the post-upload remote configuration.
A build is normally associated with the compilation of code into executable files, but the term can also apply to popular interpreted web languages that don’t require compilation, such as PHP or Ruby. For the purposes of deployment, the release build process normally includes:
  • A fresh checkout of the code to a test environment.
  • Preparation of files for the live environment, which may include minimisation of JavaScript and CSS files, and bundling individual images into single sprite files.
  • A run through all automated tests where the deployment will halt on a failed test.
  • Configuration of files for the live environment (database settings, for instance).
  • Automatic creation of release notes or updated documentation.
With the build prepared, the files can be transferred to one or more live servers with rsync or a similar utility. The files for each release should be copied to a new time-stamped directory, not directly over the live files.
In the final stage of the deployment, the equivalent of an install script is run on the server to switch from the current release to the newly uploaded release:
  • The database is backed up.
  • Database migration scripts are run on the database to modify or add the appropriate tables and columns for the latest code35. In most situations, this is safe to run on the live database because changes tend to be backwards compatible with the current live code, or should be designed to be so. In the worst case, the live site may need to be put into maintenance mode to prevent data modification while the live database is copied, major changes are applied, and the remainder of the install process is carried out.
  • Automated tests are run on the new live install. If a test fails, the install halts and all updates, including database migrations, are rolled back.
  • Cache and session files are reset.
  • The new version is made live by pointing the live server directory at the new release directory with a symlink. Using this system, no app files ever exist under the live server directory, which always points to a specific release directory.
img-20_4
Use a symlink to quickly move your website between different versions
Automated build and deployment tools are readily available in most popular web languages: Jenkins36 and CruiseControl37 (Java), Phing38 (PHP) and Capistrano39 (Ruby) are among those frequently used. Note that except for familiarity, there’s no reason why your deployment tool has to be the same language as your web app. Just because your app is in PHP, it doesn’t mean you should rule out the excellent Jenkins or Capistrano tools from your process.
For an extra layer of confidence in your release process, you should incorporate an intermediate deployment to a staging server, where you test database migrations on a copy of the live database and perform manual acceptance tests. If your team uses your app internally, you can even make the staging server the primary version of the app that you use, so that you ‘dogfood’ the new candidate version for a couple of days before pushing it out to the live server.

Updates

How often you release an update will depend on a number of factors: how rapidly you develop features; how much manual testing is required; how much time you have available for testing; and how easy or automated the deployment process is.
You should schedule releases so that you don’t build up a long backlog of changes. Each change adds risk to the release, and feedback is easier to measure when new features are released independently. Some companies like Etsy make dozens of releases a day40, but this continuous deployment approach relies on a serious investment in deployment automation and comprehensive automated test coverage. A more reasonable schedule, as adopted by Facebook and others, is to aim for a release once a week.

Summary

Tests and deployment options come in many shapes and sizes; start with critical checks to your core features and gradually expand your test infrastructure as your app features stabilise and your user base grows.
  • Create a test plan of primary and secondary features and paths.
  • Run through the test plan with your team.
  • Implement unit tests for critical functions and complex business logic.
  • Implement automated interface tests to test paths through the interface.
  • Build a profile of your target market’s browser usage.
  • Use local virtualised browsers for compatibility testing.
  • Test for accessibility issues, including alternative text, appropriate semantic markup, use of colour and keyboard controls.
  • Profile your database and web server during normal use.
  • Load test to identify resource issues and bottlenecks.
  • Stress test to assess graceful recoverability.
  • Perform manual code reviews.
  • Run automated penetration tests.
  • Develop an automated build and deployment process.